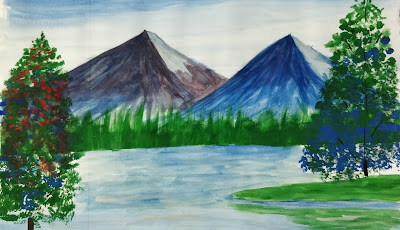
I tried making this painting as I love to paint scenery of mountains and trees. It lets my imagination run wild.
So this is what was made. Hope everyone likes it.
I call it 'Serene Mountain'. Now lets see how I made it and how easy it is to make this painting.
Materials required:
Water Color Paper:
For water color, its always better to use a water color paper. They are thick and allow you to dab in water and splash. Other paper can also be used, but make sure the paper is thick and when we wash the paper with color it should not crumble or make lumps.
Color :
One can use any water color available in the market. I used Camlin poster color.
Brush:
One Flat Brush of number 10 or 8. (Depends on the total area of the paper)
Two round brushes of number 10 and 8.
Palette:
Any palette available in the market can be used. One can even use a white dish or plate.
Process :
Take the palette and make a puddle of light blue color in the palette. The color should be minimum. We will use this to wash the paper. Now using the flat brush wash the whole page. One thing that needs to be noted here is that the page should not crumble or make lump. If lumps are forming then one needs to control the amount of water in the brush. Also the direction of the brush stroke should be in one direction only. Let the paper dry before going for the next layer.
Once the color dries, now is the time to make the mountains. For the mountains, mix a tint of red with blue in the palette. The mixture should be darker in shade from the previous wash of the blue color. Now decide which side of the mountain is facing light. In my painting light is coming from right side, so the right side of the mountain is lighter than the other side. Now on the darker side, make strokes from bottom to the top using the round tip brush. The strokes should be slanting not straight bottom to up. Make the strokes using little water so the ridges and the unevenness of the mountain comes out in the painting. Let the color dry before doing anything further.
Now we will put the next layer. In this layer we will make the grasses. For this take any strip of paper. Place the strip of paper just below the mountain from where you want the grass to begin. Now take the Number 8 round tip brush and load it with green color. Then starting from the strip of paper make upward brush strokes. The strokes should be straight up. Cover the whole horizontal area where the grass should be visible. One can use dark green and a tint of blue to make the grass. The color should be darker than the mountain in the background. Let the color dry as usual.
After the color dries now its time for the next layer i.e, the trees. Load the number 8 round tip with dark green color. Holding the brush vertically dab on the paper to make unique strokes. One can use various colors like yellow, green, blue and red. Different colors will make the painting look more vibrant. Start with the top and then going down increasing the width of the leaves. Once the color dries make fine branches in between the leaves.
Thats it !!! Try it and if their are any questions, feel free to comment.
Enjoy painting.

Comments
Post a Comment